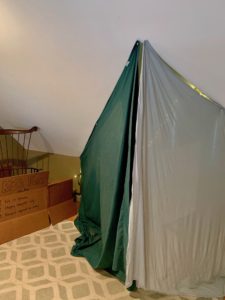
Hi everyone, Kristy here! When I was younger one of my favorite things to do was to build forts with my brothers. Our best fort was called “Potto” and it was in the woods near our house. We’d go there on weekends and play a lot of make-believe games, “spy” on the neighbors, and hang out in nature. It was the best. I also made forts at Camp. When I was in the Lodge I used to play on the back path that goes from the Lodge to the bottom of Owaissa Lawn, and I made an outdoor fort there. To this day I’m still reminded of my fort whenever I walk that path. A few summers ago the Lodgers reclaimed Lodge Campfire Site and made an epic fort down by the lake. For today’s activity I suggest that you build a fort at home! I have already built one at my house, and I’m so happy I did.
Materials Required: Your materials depend on where you want your fort. If you’re building an indoor fort then you’ll mostly need blankets, pillows, sheets, sleeping bags, sleeping pads, etc. If it’s an outdoor fort then you’ll need things like cardboard, string, and pieces of nature that aren’t alive (like sticks, rocks, and even bigger branches). Remember – Love of the Natural World means no destroying nature for your fort.
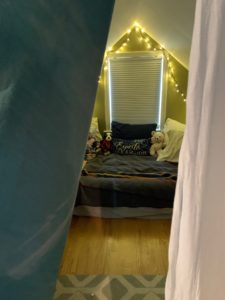
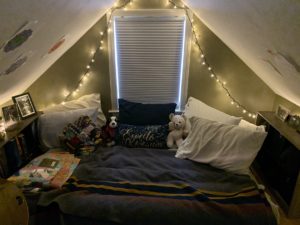
How to Build a Fort: This ‘how-to’ is really for the grown-ups because kids just instinctively know how to build forts, but for those of you who may have forgotten, I’ll help you out. Forts can have different purposes. For my fort I was aiming for a cozy getaway where I can read Harry Potter in a little magical nook. My childhood fort with my brothers was more of an active space, so that one was geared more toward spying, sneaking, and scheming for the day’s adventure.
Step 1: Decide your fort’s purpose and whether it will be inside or outside. Is it a retreat for ninjas? Is it a hideaway for marauding pirates? Is a clubhouse for exhausted adventurers? Is it a secret spot for reading and coloring? Or is it all of those things?
Step 2: Build your fort. If you can, pick a place where the fort can stay up for a while because it’s really fun to return to your fort. There should be a clear inside and a clear outside of your fort, so use your sheets, pillows, blankets, (or string, sticks, branches, and rocks) to create a barrier around your fort. The inside can have different rooms or corners for different purposes, and the outside can have lookouts and different entries into the fort… because you might need a quick getaway through a back door! Your fort will evolve over time as you play in it more, so you will likely build upon what you create today.
Step 3: Name your fort. My fort is called “KJ’s Fort” (because my family calls me KJ). As I mentioned above, my outdoor fort with my brothers was called “Potto.” You’ll know what feels right.
Step 4: Agree upon rules for your fort and post them outside so anyone entering knows the rules. For example, KJ’s Fort has 3 simple rules: 1) No cellphones allowed 2) Happy thoughts only 3) Password required for entry.
Step 5: Enjoy playing or hanging out in your fort! I’ve been visiting mine nightly for reading. It makes me very happy.
*Counselor Hack: To avoid the password becoming a tool for exclusivity, make the password announcement interactive and fun. Do the fort-builders post the password somewhere new each day and you have to find it to gain entry? Is it a themed password that rotates daily (Harry Potter theme, Camp theme, Animal theme, etc.)? Or maybe it’s a riddle that gets posted outside of the fort? Are the children in charge of the password or are the adults?
For inspiration and because I’m proud of it, here are some photos of KJ’s Fort:


Share your fort photos with us on Facebook or Instagram!